AniTa Frequently Asked Questions (FAQ)
Last updated: 4 April 2025
Contents
-
Browser in a Hotspot
-
Amazon Web Services AWS
-
OpenSSH
-
Windows 11
-
Windows 10
-
Windows 8.x
-
Execute AniTa macro from host
-
Vista and Windows 7, 8 and 10 - User Access Control (UAC)
-
AniTa in 64-bit Windows
-
AniTa in 64-bit ARM based Windows 10
-
Change RGB value of colors
-
Installation on a Central Server in a Network
-
AniTa 16-bit and Internet Explorer 5
-
Dynamic Data Exchange (DDE)
-
How to create a Trace
-
Scroll Lock: AniTa connects ok, but nothing happens on the
screen
-
56K Modem general information and troubleshooting
-
Make a modem connect at a specific speed
-
Make a modem Auto-answer
-
Make AniTa connect to dialback modem
-
Avoid modem disconnection right after connection
-
Printing from host to printer on Windows
-
Printing using LPD from host to printer on Windows
-
Keyboard problems (termcap / terminfo)
- Largest possible font size
- Connect to different hosts using same AniTa
settings (.wcf)
- Use same keyboard mappings with different .wcf
files.
Browser in a Hotspot
Browser software
AniTa version 10 and 11 only supports Internet Explorer. Not Firefox, Chrome or Edge even if they are configured to be the standard browser in Windows. This may change in upcoming versions.
Browser version emulation
It is possible to configure IE to emulate specific versions. This can be configured individually for each program hosting the browser control. It is for example needed to specify IE11 to support Google Maps coordinates.
Note that the registry key to change is sometimes documented a bit confusing depending on 32/64-bit redirection.
The best way to configure is in the HKEY_CURRENT_USER registry key.
Example, this will set IE to emulate version 11 (good for Google Maps):
[HKEY_CURRENT_USER\Software\Microsoft\Internet Explorer\Main\FeatureControl\FEATURE_BROWSER_EMULATION]
"anita.exe"=dword:00002af8
General information regarding IE Browser flags:
https://msdn.microsoft.com/en-us/library/ee330730(v=vs.85).aspx
![]()
Amazon Web Services - AWS
Question:
How can I use AniTa to connect to Amazon Web Services (AWS)?
Answer:
Starting with AniTa 11.3 you can use AniTa to connect using SSH transport with public key or password authentication. Once connected, just click the filetransfer icon and AniTa will launch the AniTa SFTP client and silently connect to the currently connected host system. No private key file conversion is needed.
OpenSSH
OpenSSH Ciphers and KexAlgorithms
Later versions of Linux and other host systems have started to ship versions of OpenSSH that does not enable all ciphers required by AniTa version 10/11.0 and earlier. AniTa 11.2 and later does not have these problems.
This can be fixed by modifying the host side SSH configuration.
The fix is a bit different depending on the version of OpenSSH.
Fedora21 and CentOS 7 with openssh 6.6.1p1
/usr/bin/ssh-keygen -t dsa -f /etc/ssh/ssh_host_dsa_key -N '' -q
remove # on this line:
#HostKey /etc/ssh/ssh_host_dsa_key
in /etc/ssh/sshd_config
Then run:
systemctl reload sshd
or on Ubuntu:
sudo service ssh restart
Fedora22 with openssh 6.8p1
Same modifications as for 6.6.1p1 above, and ...
Modify /etc/ssh/sshd_config:
Ciphers aes128-ctr,aes192-ctr,aes256-ctr,aes128-gcm@openssh.com,aes256-gcm@openssh.com,chacha20-poly1305@openssh.com,3des-cbc
KexAlgorithms curve25519-sha256@libssh.org,ecdh-sha2-nistp256,ecdh-sha2-nistp384,ecdh-sha2-nistp521,diffie-hellman-group-exchange-sha256,diffie-hellman-group14-sha1,diffie-hellman-group1-sha1
Then run:
systemctl reload sshd
or on Ubuntu:
sudo service ssh restart
no hostkey alg
This can happen in AniTa version 11.0 and earlier when connecting to modern SSH servers.
Fix:
Upgrade or update to AniTa version 11.2 or later.
The reason is most likely that the SSH server is a fairly late release and configured to only accept very high security encryption algorithms and keys.
Unknown packet received while in interactive mode, 20
This can happen in AniTa version 11.0 and earlier when connecting to SSHv2 servers.
Permanent fix:
Upgrade or update to AniTa version 11.2 or later.
Quick fix:
The following should make it work for at least 24 hours. I.E. a user should be able to work for a full day without problems. User should make sure to establish a new connection every day.
Edit the sshd configuration file, normally /etc/ssh/sshd_config, and add/change the following parameter:
RekeyLimit 3G 24h
Then restart the sshd daemon. Probably like this on Suse Enterprise:
sudo /etc/init.d/sshd restart
on Ubuntu server:
sudo service ssh restart
![]()
Windows 11
Windows 11 desktop version
AniTa 12 preview is ready.
Release Candidate versions are available now. Download here...
Windows 11 (x86) and PC's with ARM (x86 emulation) is supported starting with AniTa version 12. Release plan Q4 2022.
If there is a problem related to Windows 11, it will be fixed in AniTa 12
So far (Nov 2022) we have not received any problem related to AniTa 11 running on Windows 11.
![]()
Windows 10
Windows 10 desktop version
Released. Windows 10 (x86) is supported starting with AniTa version 11. Released Q3 2015.
Windows 10 spring update (1803) is supported starting with AniTa version 11.4 Final release is planned for Q3 2018.
Window resizing freeze and Winsock networking problems fixed. Release Candidate versions are available now. Download here...
Note: The freeze while resizing problem can also be cured by disabling the Windows "show window content while dragging" animation option in Windows advanced settings.
![]()
Windows 8
Windows 8 desktop version
Released. Windows 8 is supported starting with AniTa version 10. Released Q1 2013.
Windows RT version
Not yet scheduled for release.
![]()
Execute AniTa macro from host
The most
common problem executing a macro is that the path separator in Windows is
traditionally a backslash \.
Unfortunately, the backslash is often used as a forcing character in strings
containing commands.
The easiest way to solve the problem is to use the forward slash in all windows
paths. This is accepted by Windows since many versions back.
Example: C:\temp\yourfile.txt can also be presented as
C:/temp/yourfile.txt
In the
case of executing a macro that is contained in an escape command from host sent
by the linux echo command, you end up having 3 different decoders (AniTa macro,
AniTa transport escape command, and echo command), all using the backslash
forcing character. In order to get a real backslash, the forcing character
must be preceded by a forcing character. This means, in order to get a
single backslash all the way through the 3 decoders, there must be a lot of
backslash characters. Let’s split it up with an example. The example
will be presented using both backslash and forward slash format:
We use different colors to make it easier to see the envelopes and encoding:
AniTa Macro
AniTa Escape sequence
Echo command
We use the macro to print the file “group”
located in the “Temp” folder on the “C:” drive locally through the AniTa
terminal printers with all terminal printer settings active.
Macro syntax:
%file%print;path[[;openmode][;printer#]]
(Default values for the optional openmode is rb
(readbinary) and printer number is 1)
If we execute this macro locally. For
example mapped to a keyboard key or a hotspot, It will look like this:
%file%c:/temp/group.txt;print;rb;1
or
%file%c:\\temp\\group.txt;print;rb;1
If we enclose it in the AniTa “execute macro”
escape sequence, the enclosing parts will be like this pseudocode:
ESC [ 3 1 y
<macro>
ESC \
If we send it as a Linux echo command, the
enclosing parts will be like this pseudocode:
echo –e “ESC
3 1 y
<macro>
ESC \\c”
If this was a simple macro, without any slashes,
for example %sendip%, the real command would be:
echo –e “\033[31y%sendip%\033\0134\c”
Our more complicated command coded with forward
slash in the path will look like this:
echo –e “\033[31y%file%c:/temp/group.txt;print;rb;1\033\0134\c”
or with backslashes:
echo –e “\033[31y%file%c:\0134\0134temp\0134\0134group.txt;print;rb;1\033\0134\c”
We needed to use the octal code \0134 instead of a simple \ in the echo command
because \ is a forcing character in echo.
Vista, Windows 7, 8 and 10 - User Access Control (UAC)
Saving settings in Installation folder - UAC Virtualization
If you want all users in the same PC to use the same settings files and maybe also allow everyone to update settings, use "Save As..." in AniTa and specify a folder that is not covered by the UAC file virtualization. For example, save settings into "C:\AniTa". Then, you can also change the default AniTa startup shortcut to "C:\AniTa\anita.wcf" to startup with a common setting for all users.
Another way to get the same result, but perhaps sacrifice a bit on the security side is to install AniTa into a different folder from the beginning (for example "C:\AniTa\"). Installl to a folder that is not protected by UAC File System Virtualization.
Background
The Program Files directory (typically located at C:\Program Files and referred to as %ProgramFiles%) is where most applications store the executable files for the application. This is also the default base installation folder for AniTa.
The destination folder in AniTa installation can be set to any local folder, for example C:\AniTa, but the default AniTa folder is C:\Program Files\AniTa\ in a default or silent installation. The installation folder is also the default folder when AniTa settings are saved. AniTa is by default configured to save all settings files as a set of files with the same filename but different extensions. In a default situation, assuming that you just started AniTa using the default settings file, if you select to just "Save" settings, then all settings will use the name anita.wcf, .map, .key, and so on. If you use "Save As...", and name the settings "test", then you get a set of files starting with test.
In order to raise security, Microsoft Windows Vista introduced UAC (User Account Control) and at the same time prevented users from writing into any folder with the %ProgramFiles% base, including "C:\Program Files\AniTa\". This means that whenever the AniTa settings are saved in the "C:\Program Files\AniTa\" folder, they are actually saved somewhere else.
Within Vista, UAC lends a helping hand by virtualizing the file system. Files are automatically saved in a VirtualStore for each user. Typically "C:\Users\username\Appdata\Local\VirtualStore\Program Files(x86)\AniTa\". AniTa is not involved in this virtualization, it's all done by Windows UAC. However, this means that if one user change the default AniTa settings stored in "C:\Program Files\AniTa\", then a different user will not see the changes. Each user will have it's own private settings even though it looks like they all use the same settings files.
If this is good or bad can be discussed, but it is the way it works, and this UAC system is also implemented in Windows Server 2008 and Windows 7 and will most likely remain this way in the future.
![]()
Running AniTa in 64-bit Windows
64-bit Intel based PC running Windows 10
AniTa32 version 11 is compiled as a 32 bit program that runs in all versions of Windows. This includes both 32-bit Windows and 64-bit Windows. The general support for 32-bit s/w in 64-bit Windows comes from Microsoft and does not impose any penalty. Very few programs can take advantage of running in native 64-bit mode while the interoperability with other standard objects can become a problem. Therefor, Microsoft sometimes even suggest that you install the 32-bit version of Office in 64-bit machines though there is a 64-bit version of Office available (unless you have specific reasons to get highest possible Office access to file systems and databases)
64-bit ARM based PC (like Surface Pro X) running Windows 10
AniTa32 version 11 is supported.
Howto change RGB value of the terminal colors
The RGB value of the 64 available predefined colors can be changed in the settings
dialog for 3DBoxes. ALT-mouseclick on the color in the left palette section and change the color definition.
The new definition will be saved in the .wcf file next time settings are saved.
![]()
Installation on a Central Server in a Network
It is possible to install AniTa on a central server in a network. This central server can be a Windows server or even a UNIX machine running Fusion95. This is especially useful in larger installations.
It is not necessary to install AniTa on every PC that is going to run the software. Instead you just install AniTa once on the central server and then add a link from each workstation to the AniTa software on central server. The link would normally be from the workstation's desktop and/or start menu.
The license codes are installed on the central server, and these apply to all workstations; one license is still needed for each workstation that will run AniTa.
When it is desired to install a newer version of AniTa, you only need to upgrade the central server and then all workstation have access to the new AniTa software.
If one or more generic configurations are to be used by all users, then these can also be placed on the central server. Alternatively it is possible for users to place their individual configuration files on their local workstations. A combination of local and server-based configuration files is also possible.
The system administrator can make the AniTa installation on the central server read-only, to protect it from accidentally being changed or deleted. Normally only the system administrator would have write access to the central server, being able to upgrade AniTa or change the generic configuration files.
AniTa 16-bit and Internet Explorer 5
A problem can occur when running the 16-bit version of AniTa in a 32-bit version of Windows which has Internet Explorer 5 installed. We strongly recommend running the 32-bit version of AniTa (version 4 or later) when running on a 32-bit version of Windows in order to avoid these problems.
This applies to AniTa version 3.5.0 (and earlier). The problem occurs when connecting via TCP/IP. AniTa 3 will still run over NetBIOS and asynchronous connections, even with IE5 installed.
When Windows has Internet Explorer 5 installed, the 16-bit socket interface used to access TCP/IP is changed.
When AniTa attempts to connect via TCP/IP the following error will ocuur:
ANITA caused a General Protection Fault in module ANITA.EXE
AniTa version 4 (and later) are 32-bit programs and are not effected. To permanently resolve this problem, use the 32-bit version of AniTa when running on a 32-bit version of Windows.
This problem is resolved in AniTa version 3.5.1 ![]()
Dynamic Data Exchange - DDE
DDE can be used to communicate between AniTa and other Windows applications. Thus a Windows application that could not normally communicate with the host computer, can use DDE and let AniTa perform the communication.
AniTa has two kinds of DDE functionality. It can be configured to work as a DDE server, as a DDE client or as both.
Samples of Visual Basic programs to work with AniTa can be found on our internet server located in the directory: ftp://ftp.april.se/pub/anita/dde
AniTa as a DDE client
AniTa's DDE client capability lets you define a 'start' and a 'stop' string that are scanned for in the host output. When the start and stop strings are received from the host, AniTa connects to a DDE server enabeled Windows application, pokes the data between the 'start' and the 'stop' to the application and disconnects the DDE session. AniTa collects a maximum of 10,000 DDE characters.
To configure AniTa's DDE capabilities, select Preferences from the Config menu. Then choose the DDE dialog box. To configure AniTa as a DDE client, use the following settings:
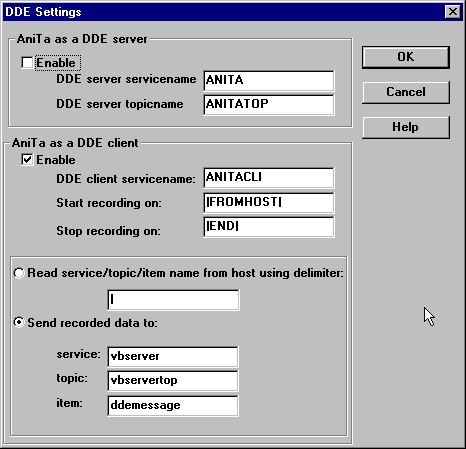
The above example "hard codes" the configuration parameters of the DDE server to which AniTa will send data. Data will be sent to the item called "ddemessage" in a topic name of "vbservertop" within a DDE service called "vbserver".
When AniTa sees the start string |FROMHOST| in the data coming from the host, AniTa starts collecting all incoming data to a buffer. (this is transparent to the AniTa user). When AniTa sees the stop string |END| in the data stream from the host, the collected data is sent to the DDE server.
A simple test from UNIX to see that this link is working is to use the echo command. This will send a string to AniTa. If the string containd the configured start and stop strings then the data in between will be sent to the configured DDE server.
In order to send the string "hello from UNIX" use the following command:
# echo "|FROMHOST|hello from UNIX|END|"If on the other hand you want to be able to specify the destination DDE server from within the host, rather than have it "hard coded" in AniTa, change the AniTa DDE parameters as follows:
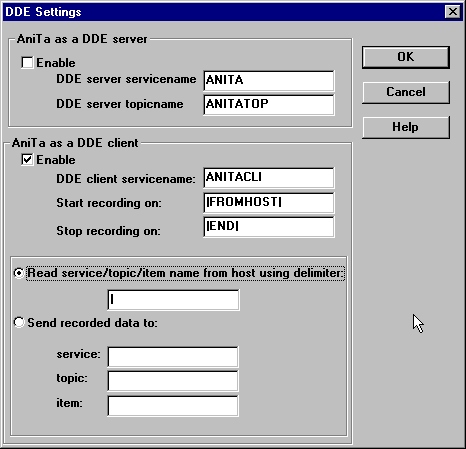
This will read the DDE server parameters (service, topic and item names) from the string send by the host. They should immediately follow the DDE start string and be seperated by the delimiter specified, in this case the default vertical bar.
In order to send the string "hello from UNIX" to the DDE server specified, use the following command:
# echo "|FROMHOST|vbserver|vbservertop|ddemessage|hello from UNIX|END|"A sample Visual Basic DDE server
We provide on our ftp server, a sample Visual Basic program that can be used in conjunction with AniTa to test its DDE capability. We provide both an executable program and the source. The DDE parameters are vbserver, vbservertop and ddemessage as used in the above examples.
![]() Get
the VBSERVER.EXE program
Get
the VBSERVER.EXE program
![]() Get
the source of the VBSERVER.EXE program
Get
the source of the VBSERVER.EXE program
AniTa as a DDE server
AniTa's DDE server capability lets you connect to AniTa and poke strings that AniTa then sends to the host just as if the text had been entered at the keyboard. Text on AniTa's screen can be read via DDE. This makes it possible for you to control host applications and to display host data from within windows programs that supports DDE.
To configure AniTa's DDE capabilities, select Preferences from the Config menu. Then choose the DDE dialog box. To configure AniTa as a DDE server, use the following settings:
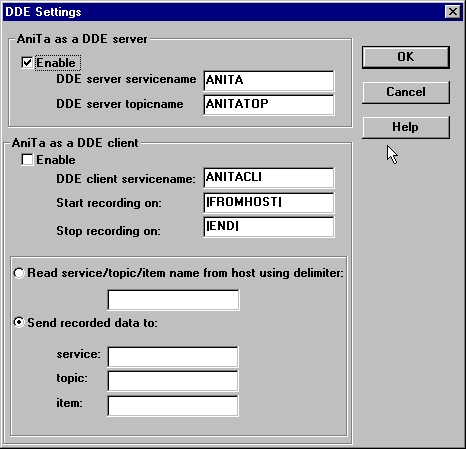
Once you have configured AniTa as a DDE server, you can send it commands from a DDE client application. There are two methods of sending commands: DDEPoke and DDEExecute. Data is returned to the application from AniTa using DDERequest. AniTa supports three DDE commands: TOHOST, TOHOSTX and GETTXT.
TOHOST command
Used with DDEPoke or DDEExecute. The TOHOST command sends the string to host as if typed. It will translate sequences like <CR> and <1B>.
TOHOSTX command
Used with DDEPoke or DDEExecute. The TOHOSTX command sends the string to host as if typed. It will perform a full macro expansion and translate sequences like <CR> and %terminal%.
GETTXT command
Used with DDEPoke or DDEExecute. The GETTXT is used to tell AniTa what portion of the screen is to be read. When you call GETTXT with valid parameters, AniTa creates an item called TXTRET and puts the return data here. You can then use DDERequest to get the return data.
The GETTXT command has two forms; it must be supplied with either four or nine parameters. The short form copies the data as it is on the screen, appending a CR/LF after each line. The long form works just like AniTa's 'table copy' function. The five extra parameters in the long form corresponds to the checkboxes and radio buttons in the 'copy table' dialog box.
The parameters to GETTXT are sent as string containing a semicolon-separated list of integers. The parameters are:
- Start column - first column is 0 - usually in the range 0 to 79
- Start row - first row is 0 - usually in the range 0 to 23 (or 24)
- Number of columns - usually in the range 1 to 80
- Number of rows - usually in the range 1 to 24 (or 25)
- Field separator character - ascii code for field separator (tab = 9)
- Delete leading spaces - 1=do - 0=don't
- Delete trailing spaces - 1=do - 0=don't
- End of line separator - 0=CR/LF - 1=Use field separator
- Single space is - 0=new field if before digit or hyphen - 1=new field - 2=space.
Examples:
- "0;0;80;24" Get the whole (80x24) screen.
- "0;0;80;25" Get the whole (80x25) screen.
- "0;0;10;1" Get ten first characters of first line of the screen.
- "0;0;80;10;9;1;1;0;0;" Get all 80 chars of first 10 lines of the screen. Use the tab character as field separator, delete leading and trailing space, use CR/LF as line separator, single space is new field if before digit or hyphen.
TXTRET command
Used with DDERequest. The TXTRET is used to read from AniTa's screen. You must preceed it with a GETTXT command in order to tell AniTa which part of the screen is required.
Sending commands via DDEPoke
In the following examples we use service ANITA and topic ANITATOP, which are the default settings for AniTa and which are shown configured above. If you change AniTa's DDE configuration, then change these in the examples as well. The item is always the name of the command, and is thus not configurable when AniTa is a server.
To send commands to AniTa via DDEPoke, send to an item with the same name as the command. You cannot send embedded NULL characters in the string. The poked string's maximum length is 100 characters.
For example, you could poke the string "getinfo karlsson<cr>
|
DDE Command: |
DDEPoke |
|
DDE Service: |
ANITA |
|
DDE Topic: |
ANITATOP |
|
DDE ITEM / AniTa Command: |
TOHOST |
|
String: |
getinfo karlsson<cr> |
Sending commands via DDEExecute
To send commands to AniTa via DDEExecute, send a command to the AniTa's
service/topic pair, prepending the data with the command name and a semicolon.
There must be no space between the command name and the semicolon. To send the
string in the example above, you would DDEExecute the string "TOHOST; getinfo
karlsson<cr>
|
DDE Command: |
DDEExecute |
|
DDE Service: |
ANITA |
|
DDE Topic: |
ANITATOP |
|
String: |
TOHOST;getinfo karlsson<cr> |
Getting data via DDERequest
To obtain data from AniTa's screen, first send a command using DDEPoke/DDEExecute telling AniTa which part of the screen you wish to read, and then issue a DDERequest to item TXTRET to read the data.
Tell AniTa what to read (all 80 columns and 24 lines):
|
DDE Command: |
DDEPoke |
|
DDE Service: |
ANITA |
|
DDE Topic: |
ANITATOP |
|
DDE Item / Anita command: |
GETTXT |
|
String: |
0;0;80;24 |
Read the returned data:
|
DDE Command: |
DDERequest |
|
DDE Service: |
ANITA |
|
DDE Topic: |
ANITATOP |
|
DDE Item / Anita command: |
TXTRET |
A sample Visual Basic DDE client
We provide on our ftp server, a sample Visual Basic program that can be used in conjunction with AniTa to test its DDE capability. We provide both an executable program and the source.
![]() Get
the VBCLIENT.EXE program
Get
the VBCLIENT.EXE program
![]() Get
the source of the VBCLIENT.EXE program
Get
the source of the VBCLIENT.EXE program
A sample Microsoft Word macro
The following VBA (visual basic for applications) code uses DDE via AniTa to obtain the time from the host and insert it into the current Word document. It has been tested with Word 97 under Windows 95. AniTa has to be running for this to work.
It works by first sending the command "clear" to UNIX, and waiting 3 seconds for this to be performed. Then it sends the command "date", the result of which will now appear on the top two lines of the already cleared screen. After 3 seconds, it reads the first 30 characters of the line containing the UNIX date and inserts this into the Word document together with a comment. It is not necessary to use the ddedelay, but it does make the example simpler.
Public Sub MAIN()Dim ChanNum
Dim a$
ChanNum = WordBasic.DDEInitiate("ANITA", "ANITATOP")
If ChanNum <> 0 Then
WordBasic.DDEPoke ChanNum, "TOHOST", "clear <cr>"
ddedelay 3
WordBasic.DDEPoke ChanNum, "TOHOST", "date <cr>"
ddedelay 3
WordBasic.DDEPoke ChanNum, "GETTXT", "0;1;30;1"
a$ = WordBasic.[DDERequest$](ChanNum, "TXTRET")
WordBasic.Insert "The date and time on our UNIX host is:"
WordBasic.Insert a$
WordBasic.DDETerminate ChanNum
End If
End Sub
Public Sub ddedelay(seconds)
Dim Start
Start = Timer()
Do While Timer() < Start + seconds
DoEvents
Loop
End Sub
How to create a Trace
Sometimes when a problem occurs running an application in AniTa, the resolution can best be determined by creating a trace file. This trace file contains the all communications between the host computer and AniTa.
To record the communications in a trace file, perform the following steps:
-
Make sure that AniTa is not configured to automatically
connect when started.
> In the Config menu, go to the Preferences -> View dialog box.
> Disable "connect when started". - >
Set the name of the trace file created.
In the Config menu, go to the Preferences -> Files dialog box.
Make sure that the "Com Recording/Trace File" name is set to "anita.trc". - Save this configuration and exit AniTa.
- Start AniTa.
- In the Special menu, enable "Record Comm".
- Connect to the host system and login.
- Start the application
- Reproduce the problem so that it appears on the screen.
- In the Special menu, disable "Record Comm".
- Exit the application and terminate AniTa.
You have now created a trace file. It will be called "anita.trc" and will be located in the same catalog as the configuration file used to start AniTa. This is normally "anita.wcf" located in the "C:\Program Files\AniTa" catalog.
This trace file will contain all the characters and escape sequences sent by the host to AniTa and all the keyboard input sent by AniTa to the host.
If you are using this file to report a problem to support, please send the AniTa configuration file "anita.wcf" as well as the "anita.trc" file. This will enable support staff to play back your recording, using you same configuration and see the problem as it appears on your screen.
Scroll Lock
Question:
AniTa connects OK (the toolbar phone gets green) , but there is nothing on the screen.
Answer:
The default Scroll Lock mapping in AniTa version 3 and 4 is %hold% which is used to temporarily hold data reception.
Fix: Toggle the Scroll Lock key and verify that this is really the problem.
You can permanently remove the Scroll Lock mapping the following way:
1. enter the keyboard mapping dialog.
2. click on Scroll Lock on the graphical part.
3. click on delete button.
4. click OK to leave the dialog.
5. go back in and verify that %hold% mapping is now gone.
Make a modem connect at a specific speed
Question:
How is it possible to make a modem connect at a specific speed? When I establish a serial connection with a Modem it always uses its highest speed, for example 28,800 baud, how do I setup the modem to use a slower speed such as 19,200 baud.
Answer:
There is a Hayes AT command to set the highest link rate. It is the S37 register value. The command can be added to the Modem init string configured in the AniTa "Modem type" menu. Here is a list of command values:
| 0 | Use Last AT Speed |
| 1 | Reserved (75) |
| 2 | Reserved (110) |
| 3 | 300 |
| 4 | Reserved (600) |
| 5 | 1200 |
| 6 | 2400 |
| 7 | 4800 |
| 8 | 7200 |
| 9 | 9600 |
| 10 | 12000 |
| 11 | 14400 |
| 26 | 16800 |
| 12 | 19200 |
| 33 | 21600 |
| 29 | 24000 |
| 34 | 26400 |
| 15 | 28800 |
Examples:
ATS37=9 to set the highest link rate to 9600
ATS37=12 to set the highest link rate to 19200
ATQ0V1E1S0=0S37=9 Initialize the modem and set the highest link rate to 9600
For more information have a look at:
General modem information:
https://modemsite.com/56k/ General 56K Modem
information and troubleshooting
Make a modem Auto-answer incoming calls
Question:
How do I make AniTa modem accept incoming calls?
Answer:
Autoanswer is normally configured using the S0 register. The S0 value is the number of incoming ring signals before answering.
The default AniTa Modem Init string is set to: S0=0 (disabling incoming calls since you will normally dial out). If you want AniTa to wait for an external call, do the following:
1. Disable "Phone Number/Auto-dial"
2. Change the "Initialize" string in the "Modem type" menu.
3. Click the AniTa "Connect" button. (Wait for someone to dial
in)
Example: AT&FQ0V1E1S0=1
Connect to dialback modem
Question:
How do I connect to a dialback modem?
Answer:
Dialback is a feature in a modem. It can typically be configured in
many different ways.
If both modems are of the same type, It can be configured without changing
any of the computers involved. (read the modem manual to find out how to
configure it).
If the remote modem is configured for dialback to any incoming modem,
you need to enable Auto-answer in the AniTa end to get it working.
Auto-answer is described above. The following is a typical
example of what's happening when you connect to a dialback modem:
- You click the "Connect button" in AniTa. This will start the dialling into the romote modem.
- The remote modem answers the call and asks for a password and/or your phone number.
- The connection is hung up by the remote modem.
- The remote modem dials back to your modem.
- Your modem answers the incoming call (make sure you have configured the S0=1 register to autoanswer).
- You get a "CONNECT XXX" message on the screen.
- The remote computer gets a "CONNECT XXX" message from the remote modem.
- The remote modem sends the login message.
- You login to the remote computer system.
Avoid modem disconnection right after connection
Question:
How do I stay connect after connecting? The line gets connected OK, but is immideately disconnected when data is sent or received.
Answer:
There may be many reasons for this to happen, so we know we can't give you a good single answer here. One reason is that the modems are simply not compatible for automatic link speed negotiation. You need to find out how to configure your specific modem to connect at a specific highest link rate. Consult your modem reference or try the speed connect method above.
Another reason may be that the speed between the computer and the modem is not the same. This can typically be configured using the AT&B1 command. &B1 means: use fixed rate between the modem and the CPU. This is typically needed on the mainframe side.
Printing from UNIX host to printer on Windows
Question:
My host application can print to the printer connected to one AniTa Windows PC printer while the same application can't print to a printer connected to another AniTa Windows PC printer. What can possibly be the reason?
Answer:
There may be many reasons for this to happen, so we know we can't give you a good single answer here. One reason is often:
The printer may not support normal byte stream data. Some printers (
typically low-cost) only support something Microsoft and printer manufacturers
call: "Windows Printing System". A part of the printer driver is running in the
PC. This means that there must be a machine sending data to the printer
using the Windows Printer GDI API. It also means that other operating systems
can't use the printer directly in the traditional "lineprinter" way. AniTa can
try to support passthrough printing from UNIX to the printer by translating the
UNIX byte-stream to the Windows GDI interface. You configure this in AniTa
Terminal #1 dialog by changing to: "GDI printer driver" (from the default:
"Send host formatted ...").
You can test if the printer is working in byte stream mode and/or just
in GDI mode. Do the following:
- In the menu: Config->Preferences->Printers, configure AniTa Terminal Printer#1 to "GDI Printer Driver".
- Send a ltext line einding with CR LF FF to the printer. This can be done from the UNIX command line:echo "\033[5itext\r\n\f\033[4i"
- or if you don't want to connect to the host, by mapping an AniTa key to the following:%local%<esc>[5itext<cr lf form esc>[4i
-
Send the test line to the printer. If this does works, then your printer
is connected to the PC correctly and the printer driver for it is working. All
your Windows programs like Word, Notepad and AniTa "screendump" will work.
- In AniTa, change from "GDI Printer Driver"
to "Send host formatted data directly to the printer".Send the test line to the printer again. If this does not work, then your printer does only support GDI formatted data.
Printing using LPD from host to printer on Windows
Question:
Is it possible to use UNIX/AIX/Linux LPD to print to Windows printers?
Answer:
Yes, with AniTa version 7.
AniTa version 7 Enterprise license includes the AniTaLPD program. AniTaLPD supports the LPD printing protocol. This makes it possible to print from the UNIX applicatioin to a printer located on the AniTa PC or the network where AniTa is connected. The general rule is: If the printer can be used from Windows, then you can print to it from UNIX.
Features.
The
AniTaLPD task can be started/stopped automatically every time AniTa is
started/stopped. Printing can be filtered through the same filters and
configuration as the Terminal Printer configured in AniTa. It can also be
set up to route print data to different AniTa printers based on the LPD
queue name. Another feature is the /cat parameter that allows raw
datastreams to be printed using for example the netcat freeware
program. AniTaLPD can also be used to receive files to disk. It is
possible to send an escape string to AniTa that starts up AniTaLPD on a specific
port to receive one single job and save it to disk, then exit.
AniTaLPD supports multiple parallell
sessions.
Starting AniTaLPD can be done either from the command line or from the AniTa menu: Config->Preferences->LPD Server.
Keyboard problems (termcap / terminfo)
Question:
Some of the keyboard keys (like screen movement) doesn't work.
The screen
movement using any keyboard key (including the arrow keys) are handled by the
host application. The host side knows which code AniTa sends when an
arrow key is pressed. The problem can be that the host application for
some reason has a different opinion about which keyboard codes AniTa will send.
Answer:
Termcap and terminfo overview.
All
UNIX/AIX/Linux hosts keep a terminal capabilities definition database. It
is called termcap on older systems and it has later been enhanced and
most applications now use the terminfo system. The application will for
example read termcap or terminfo to find out what a left-arrow key is sending.
Termcap is a text file including all supported terminal types while in terminfo,
each terminal type is compiled into a very small file that exists in a terminfo
tree with one folder for each starting letter. Terminfo and termcap keep
the terminal screen and keyboard capabilities. Each capability has a name
(the name is different in termcap compared to terminfo). There is one
terminfo entry for each terminal type supported by the system. You can add
your own entry, or use an existing entry. Termcap can be modified with any text
editor. Terminfo can be decompiled, change and then recompiled into the
terminfo tree. The terminfo command to decompile an entry can
be:
infocmp
or
infocmp
vt220>my220
The terminfo command to compile an entry can
be:
tic my220
How does the host know
what kind of terminal is connected?
TCP/IP: When the terminal (AniTa)
connects to the host over TCP/IP using telnet or OpenSSH, the host will get the
terminal type automatically. This is built into the telnet and OpenSSH
protocols and always used by the host terminal server. It will result in
the TERM environment variable being set to the terminal type AniTa is configured
for. Some host systems have a hard coded function in the .profile script
that sets TERM to some predefined type assuming that all terminals that connect
are all the same. (.profile is the script that normally gets executed when
a use logs in). AniTa is by default configured to send the last word of
the terminal type you have selected. Example: If you select DEC
vt220, then AniTa will only send vt220. This is configurable in
the AniTa menu: Config->UNIX ENV where the macro %terminal% represents the
last word of the terminal selection. If you want to run AniTa in vt220
mode and fool the host that it is actually a my220 terminal then change it to:
TERM=my220.
Serial: If you connect directly to the host serial line or
over a non-TCP/IP modem line, then the TERM variable is not automatically set
since there is no "protocol" involved. It is common practice for the host
to enquire the terminal about the terminal type by sending the 'answerback'
code. AniTa will respond to the 'answerback' code by sending the terminal
type configured. This can be changed in the AniTa terminal settings
dialog, "Answerback" configuration.
After logged into the host, you can find
out what the TERM variable is set to using the command:
echo
$TERM
If the reply doesn't correspond to the terminal type
you have configured AniTa for, then the TERM= mechanism doesn't
work.
How does AniTa know what terminal it is emulating and which
keyboard codes to send?
You can change the terminal emulation mode in the
AniTa menu dialog: Config->Terminal Emulation. After changing the
terminal type and exiting the dialog you will get the question: "Load default
keyboard map, definitions, ....." Make sure you answer Yes
unless you have very specific reasons to keep the existing keyboard
mapping. Custom keyboard mapping is described in detail in the AniTa
User's Guide.
NOTE! Very Important: After changing terminal type you
must disconnect and re-connect again for the host to know you have changed the
terminal type and update the TERM variable. Else the host may still think
you are a vt220 while you may have changed your own keyboard mapping to for
example Linux.
![]()
Largest possible font size
Question:
There are gray areas around the text. How do I make the text fill the screen as much as possible?
Answer:
Quick tip to fill the screen with largest possible text size:
1. First of all it may be good to know that, if your PC screen resolution column in the following table has a 'Yes', then it is possible to completely fill the horizontal screen.
| 1600x1200 | 1400x1050 | 1280x1024 | 1024x768 | 800x600 | 640 x 480 |
| Yes | No | Yes | No | Yes | Yes |
2. You can make it look like the screen is filled by doing the following:
- Remove AniTa bars you don't need. This is done in the menu: Config->Preferences->View.
- Decrease the size of the reserved button area space around the text portion. This is done in the same dialog. You can set top/bottom/left/right and "frame size" to 0.
- Change the frame fg and bg color to the same color as your application (dark white).
- Change to another font. Try the AniTa font if you have a high res video board. It works fine for resolutions higher than 800x600. ftp://ftp.april.se/pub/anita/fonts
Detailed Answer:
General Font Scaling
True Type and
OpenType
AniTa supports True Type and Open
Type fonts. These fonts are defined as a mathematical algorithm. One very
nice feature is that all True Type and Open Type fonts are scalable by the
display driver.
Bitmapped
AniTa supports
Bitmapped fonts. Each character in a bitmapped font is defined as a bitmap. Each
size of a character in the font selection list is represented by its own bitmap.
This means that bitmapped fonts are scalable to the predefined bitmaps that are
installed. The display driver will also allow scaling a bitmap font to any power
of 2 by simply stretching the bitmap.
Largest possible character size
Maximize screen ( the WINDOW button )
allows using largest possible fonts. When the maximize button (in the upper
right corner) is pressed, the whole screen will be occupied by AniTa and the
area around the screen will be filled with the frame background color. The frame
border size (and the fill region around) will be reduced to zero if the
currently selected font fills the whole screen. Some screen resolutions
will use the full screen size and some won't. The rule is that the
horizontal screen resolution (pixels) must be evenly dividabale with
the number of columns.
Examples:
(All
examples assume 80 columns since this is the most common number of
columns)
Example 1: On a 800x600 resolution you get 800 / 80 =
10 pixels/character.
Example 2: On a 1024x768 resolution you get
1024 / 80 = 12,8 pixels/character. There will be 0,8 pixel/column
left (64 pixels)
Example 3: On a 1280x768 resolution you get 1280 /
80 =
16
pixels/character.
As you can see from the examples, some screen resolutions will fit exactly. The following table shows the some of the most common screen resolutions. It inducates if 80 columns can completely fill the horizontal screen. The table assumes you are using a scalable font like TrueType Courier New or AniTa.
| 1600x1200 | 1400x1050 | 1280x1024 | 1024x768 | 800x600 | 640 x 480 |
| Yes | No | Yes | No | Yes | Yes |
The AniTa default 80 column font face is the standard Windows True Type font Courier New-12 bold for SVGA and High Res resolution screens, and Courier New-10 for VGA screens. Best visibility is Courier New Bold 13 that also fits on the common 800x600 SVGA resolution screens, but then the AniTa function buttons may be a bit narrow. This can however be adjusted by reserving a fixed amount of space for the button panels (this is done in the menu: Config->Preferences->View), or aligning the AniTa display to the bottom, or disabling the status bar. Note that the standard Windows Font selection dialog does for some unknown reason not list Courier New 13 as a possible choice, but you can still type 13 into the size field an get that size. Recommended font in 132-column mode is Terminal 6 or 9. Automatic font scaling When automatic scaling state is enabled (by checking Scale Font to View in the View menu) the font size will be scaled to the largest possible size that fits into the horizontal size of the window when the window size is changed. (The vertical size of the window can still be changed to allow resizing the window in history scroll back mode without changing the font size. ) The window is then shrunk or extended vertically to fit that font exactly. If there is no font size small enough, the last selected size will be used, and scroll bars enabled. Note that the maximum font size is calculated after the top, bottom, left and right button panel reserved space has been taken into account.
Connect to different hosts using same AniTa settings (.wcf)
Question:
How do I connect to different hosts using all the same settings except the host IP address?
Answer:
There are 2 easy ways to do it.
1. Create a
shortcut on the desktop that sepcifies the host address on the command
line. This will override the .wcf file setting.
Example:
"C:\Program Files\AniTa\Anita.exe" /ip:hostname.
2. Use "Recently used
host list".
AniTa keeps a record of all hosts connected to. The list is
kept in a text file. The file name can be configured in the menu:
Config->Preferences->Files. It is possible to disable updating of
the file. The default name of the file is anitahosts.txt. This method requires "Prompt
for host" to be set (in menu: Config->Preferences->View).
Use same keyboard mappings files with different .wcf files.
Question:
How do I use different .wcf "settings files" that use the same mapping files (.key, map, xlt, .dyn, ....)?
Answer:
AniTa settings are stored in a number of files. The main file with most of the settings is by default named AniTa.wcf. Settings for the keyboard mapping, screen button descriptions, dynamic hotspots normally follows the .wcf file name, but with other extensions (like .map .key .but .dyn and a few more). When you save the setting using your own specified name, you also normally save a set of these files. The .wcf file contains file name pointers to these files, and it is possible to create multiple .wcf files that points to the same set of mapping files. In AniTa, go to the menu Config->Preferences->Files and uncheck the "Autoname to same as settings" parameter. Then change the file names to whatever your first .wcf file was.